From Model to Data
Last updated on 2026-06-12 | Edit this page
Overview
Questions
- Why use a tool like OpenRefine instead of writing RDF manually?
- How can a CSV table be transformed into RDF?
- What is reconciliation?
Objectives
- Load a CSV dataset into OpenRefine and navigate its interface.
- Implement the data model from the previous chapter using RDF-Transform.
- Define a root node for the Person entity and attach properties to it.
- Complete the Object entity and connect it to the Person.
- Reconcile text values against Wikidata and ULAN to replace them with IRIs.
In the previous chapter, we designed a data model for our Met dataset: we identified the entities, chose classes and properties from shared vocabularies, and planned how the columns of the table map to RDF triples. We know what we want to produce. Now we need a way to actually produce it.
Writing RDF by hand works well for a handful of triples, but becomes impractical quickly. A dataset with 50 rows and multiple properties per entity would require hundreds of triples, each written out. The tool we will use to automate this transforming process is OpenRefine with the RDF-Transform extension.
What Is OpenRefine?
OpenRefine is a free, open-source tool for working with tabular data. It runs in the browser but operates locally on your computer, your data never leaves your machine. Originally developed to clean and transform messy datasets, OpenRefine has grown into a general-purpose tool for data exploration and enrichment. If you are interested, there is a Carpentries Lecture “OpenRefine for the Humanities” you can go through to get a deeper insight of the tool.
The feature we want to look at is the RDF-Transform extension, which adds the ability to transform tabular data to RDF. Instead of writing triples by hand, we define a mapping: which columns become subjects, which become predicates, which become objects and OpenRefine applies it to every row automatically.
Prerequisites
This chapter requires OpenRefine and the RDF-Transform extension to be installed. Step-by-step installation instructions for both can be found on the setup page of this lesson.
Open OpenRefine in your browser. You will see the start screen, which lets you create a new project by importing a file.
Loading the dataset:
- Click Create Project → This Computer and select
the file
met-dataset-50.csvand click Next. - OpenRefine previews the data. Here you can configure more detailed import settings if necessary. In our case everything should be set up correctly.
- Click Create Project.
You should now see the dataset as a table: 50 rows, one per museum object.

The interface has a few key areas worth knowing:
- Column headers each have a small dropdown arrow. Clicking it opens a menu with options to transform, filter, or rename that column.
- Facets and filters (left panel) allow you to explore and narrow down the data.
- Undo / Redo (top left) keeps a full history of all changes you make. You can step backwards at any point.
- RDF Transform button in the top menu bar opens the extension panel where we will define the entire mapping.
What is RDF-Transform
RDF-Transform is an extension for OpenRefine that provides a visual interface for defining how tabular data becomes RDF. You describe the mapping once, which columns represent which entities, which properties they have, and how they connect and the extension generates the RDF output for every row automatically.
To open it, click RDF Transform in the top menu bar of an open project, then select Edit RDF Transform…. This opens the mapping panel.
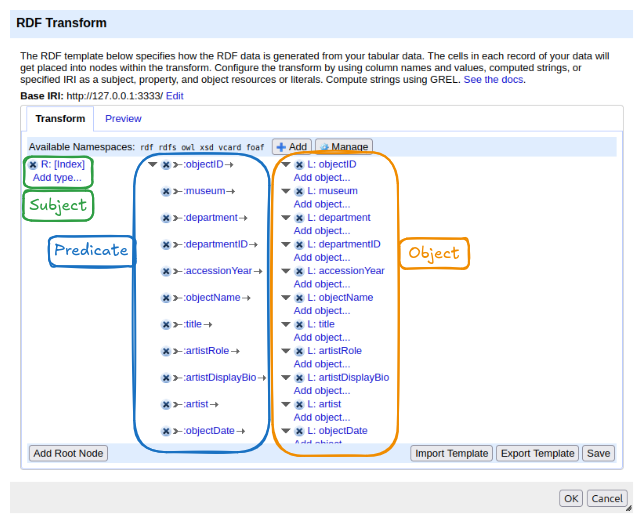
The panel has two tabs:
- Transform: where the mapping is configured. This is where you will spend most of your time.
- Preview: shows a sample of the RDF output based on the current mapping, updated live as you make changes.
At the top of the Transform tab you will find:
- Base IRI: the default namespace used when constructing IRIs from column values. It can be changed to match your project.
- Available Namespaces: the prefixes declared for use in the mapping. Several common ones (rdf, rdfs, owl, xsd, vcard, foaf) are pre-loaded. New namespaces can be added with the + Add button and managed with Manage.
The main area shows the mapping structure. When you first open RDF-Transform on a dataset, it automatically generates a starting point: it reads all column names and creates one property per column, using the column name as the predicate. This auto-generated mapping is a useful overview of what data is available, but it is not yet meaningful RDF, it uses made-up property names and treats everything as a literal. We will replace it with our own mapping.
The structure of the mapping follows the triple model you already know:
- On the left: a root node — this becomes the subject of the triples. The default root node uses the row index as the subject.
- In the middle: properties — these become the predicates.
- On the right: objects — literal values from columns, or links to other root nodes.
At the bottom of the panel, the Add Root Node button lets you add a new entity type to the mapping. The Import Template and Export Template buttons allow you to save and reuse a mapping across projects. Save applies the current mapping to the project.
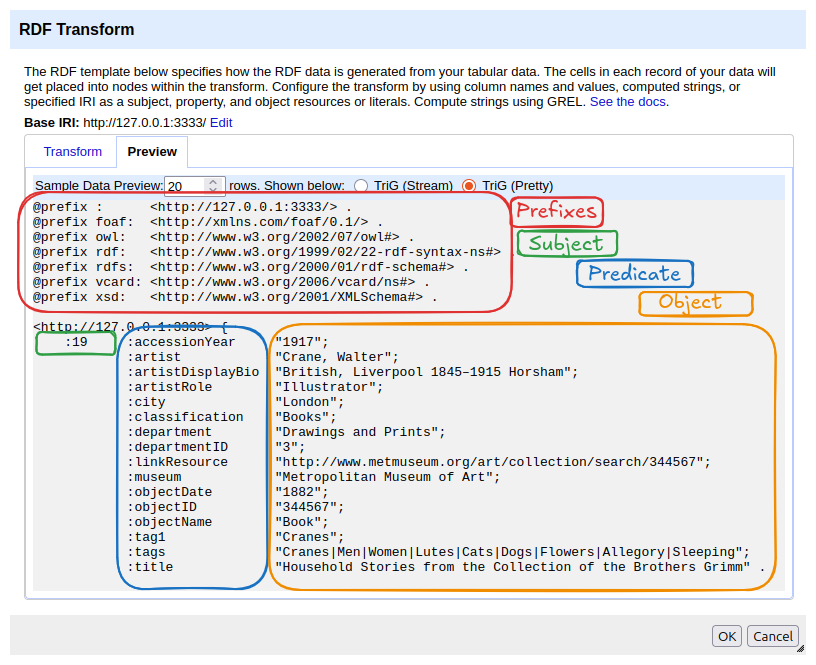
To get a first impression of what the data looks like as RDF, switch to the Preview tab. It shows the current mapping rendered as Turtle. At the top you will see the declared namespaces, followed by the generated triples. In the auto-generated mapping, each row’s index becomes the subject, and each column header becomes a predicate with the corresponding cell value as a literal object.
Creating the Person Entity
Starting Fresh
The auto-generated mapping is a useful preview of the data, but it is not the model we designed. Before we build our own mapping, we clear it: click the × button next to the existing root node on the left side of the mapping area two times. This removes the root node and all its properties. The panel should now be empty except for the buttons at the bottom.
Screenshot??
A Note on IRIs and Identity
Before we create the first root node, we need to think about one thing: what IRI should identify each Person?
The auto-generated mapping used the row index, row 1, row 2, row 3, and so on. That works if the entire dataset describes only one type of entity. But our model has two: a Person and an Object per row. If both used the row index, row 1 would produce a Person IRI and an Object IRI that look identical in structure, making them impossible to distinguish.
More importantly, the row index ignores the actual content of the data. If the same artist appears in five rows, the auto-generated mapping would create five different Person IRIs, one for each row, even though they all refer to the same person. In Linked Data, the same real-world entity should always have the same IRI.
The solution is to construct the IRI from a column value that
uniquely identifies the entity. For the Person, we use the
artist column. Two rows with the same artist name will
produce the same Person IRI, which is exactly what we want: in the
resulting graph, both museum objects point to the same person node.
# Two objects, same artist → same Person IRI
<http://example.org/object/693151>  schema:creator  <http://example.org/person/Surugue%2C+Louis> .
<http://example.org/object/703022>  schema:creator  <http://example.org/person/Surugue%2C+Louis> .
This IRI is still a local placeholder, it is not a globally recognised identifier. We will link it to the world of LOD later. But it is stable, unique per artist, and consistent across the dataset.
Adding the Schema.org Namespace
Our Person entity uses schema:Person and
schema:description, both from Schema.org. The namespace is
not pre-loaded in RDF-Transform, so we add it first.
- In the Available Namespaces bar, click + Add.
- Enter the prefix
schemaand the namespace IRIhttps://schema.org/. (In newer versions of OpenRefine the IRI gets autofilled) - Click ok.
The prefix schema should now appear in the namespace bar
alongside the pre-loaded ones.
Creating the Root Node
- Click Add Root Node at the bottom of the panel.
- A new root node appears. Click on it to configure it.
- Set the content to artist.
- In the Content used… panel, select IRI.
- Click ok
[Screenshot: Person root node configured with artist column and base IRI]
Adding Properties
Now we have already created our root, but the Preview is still emtpy. We need to add properties to create a full triple.
Type
- Click Add type… below the root node (or Add
property and choose
rdf:type). - Set the value to the fixed IRI
schema:Person. - You can click Add it to reuse the imported properties from schema
This produces the triple:
<person-IRI> rdf:type schema:Person. We can see this
in the Preview tab.
Label
- Click Add property… to create a new property for our person root node.
- Click on that new property set it to
rdfs:label. - Click on Add object… and then Configure? .
- Set the Content to artist again and Content used… to Text .
This step could seem redundant, because we already used artist. Initially, we only set the IRI of the entity, which is just an identifier without any content or meaning. Then, we added the name as the actual information to this ID. For the IRI you could theoretically choose whatever you want, for the concrete label, the name of the entity, it can only be artist.
Description
- Add another property by clicking Add property in
the middle and set it to
schema:description. - Add the related object, click Configure? and set
the Content to
artistDisplayBio. - Content uesd…: Text.
Once all properties are added, click Save and switch to the Preview tab to check the output. One block per row should appear, each describing a person:
<http://example.org/person/Surugue%2C+Louis>
    a schema:Person ;
    rdfs:label "Surugue, Louis"@en ;
    schema:description "French, Paris ca. 1686–1762 Grand Vaux" .
You will notice that in the preview some persons appear multiple times, once for each row that shares the same artist name. In RDF Databases and so called Triplestores, duplicate triples are automatically merged, the result is a single Person node with the same IRI, not multiple separate persons. This is one of the reasons we chose the artist name as the IRI source rather than the row index.
Choosing the Right IRI Source
When constructing IRIs from column values, a good rule of thumb is to
prefer stable identifiers over text strings. The
artist column is a text string, names can be spelled
differently, contain typos, or change. A numeric ID column (like
departmentID) is a more reliable IRI source: it is assigned
once, does not change, and is not affected by language or formatting
differences.
For the Person entity we have no choice but to use the name string, since the dataset does not include a separate artist ID. This is a common situation in real projects: the data you have rarely matches the ideal you would design from scratch. Data modelling is seldom about finding the one correct solution, it is about making the best decision given the available data, the intended use, and the constraints of the project. The result may not be textbook-perfect, but it can still be consistent, meaningful, and useful. Reconciliation, which we will cover later, is one way to compensate: it replaces a fragile text-based IRI with a stable, authoritative one after the fact.
Exercise: Create the Department Entity
Using the Person entity as a model, now create a root node for the
Department entity. The dataset has a dedicated
departmentID column, use this as the IRI source rather than
the department name.
The Department entity should have the following properties:
| Property | Value source | Type |
|---|---|---|
rdf:type |
schema:Organization |
IRI |
rdfs:label |
department |
Text |
schema:parentOrganization |
museum | Text |
Check your result in the Preview tab before moving on.
Department root node: - Base IRI:
http://example.org/department/, column:
departmentID - rdf:type →
schema:Organization - rdfs:label →
department column, literal -
schema:parentOrganization → Museum root node
The Preview tab should show output like this:
<http://example.org/department/3>
    a schema:Organization ;
    rdfs:label "Drawings and Prints" ;
    schema:parentOrganization "" .
Exporting the Data
With the mapping complete, we can export the dataset as RDF. Click the Export button in the top right corner of OpenRefine, not inside the RDF-Transform panel, but in the main project view. The RDF-Transform extension adds several RDF format options to the export menu.
We will export the data twice: once as Turtle and once as JSON-LD.
- Select Pretty Exports and Turtle from the export menu and save the file.
- Repeat and select JSON-LD.
Open both files in a text editor and compare them.
Turtle will look familiar from the previous chapters, compact, human-readable, with namespace prefixes at the top:
@prefix rdf: <http://www.w3.org/1999/02/22-rdf-syntax-ns#> .
@prefix rdfs: <http://www.w3.org/2000/01/rdf-schema#> .
@prefix schema: <https://schema.org/> .

<http://example.org/person/Surugue%2C+Louis>
    a schema:Person ;
    rdfs:label "Surugue, Louis"@en ;
    schema:description "French, Paris ca. 1686–1762 Grand Vaux" .

<http://example.org/department/3>
    a schema:Organization ;
    rdfs:label "Drawings and Prints" ;
    schema:parentOrganization <http://example.org/museum/Metropolitan+Museum+of+Art> .
JSON-LD encodes the same triples in JSON syntax. It is less readable at first glance, but follows a structure that web developers and APIs work with readily:
JSON
[
  {
    "@id": "http://example.org/person/Surugue%2C+Louis",
    "@type": ["https://schema.org/Person"],
    "http://www.w3.org/2000/01/rdf-schema#label": [
      { "@value": "Surugue, Louis", "@language": "en" }
    ],
    "https://schema.org/description": [
      { "@value": "French, Paris ca. 1686–1762 Grand Vaux" }
    ]
  }
]
The data is identical, both files describe the same entities with the same properties and the same values. The serialization format is just a different way of writing down the same graph. A triple store or RDF tool can read either format and produce the same internal representation.
- OpenRefine with RDF-Transform turns a tabular mapping into RDF automatically, applying it to every row in the dataset.
- IRIs for entities should be constructed from stable column values, not row indices, this ensures that the same real-world entity always gets the same IRI across rows.
- A root node represents a subject entity; properties attached to it become predicates, and their values become objects, directly mirroring the triple structure.
- The same RDF graph can be exported in multiple serialization formats; Turtle is readable and compact, JSON-LD integrates with web development workflows.